Keep your SharePoint in sync. Download and try today.
Data Provider for ODBC - Q & A
The Layer2 Cloud Connector for Microsoft Office 365 and SharePoint can connect 32-bit and 64-bit ODBC data sources (and almost any other sources) with native list in SharePoint on-premise or online, in just minutes, without any coding, bi-directional if required. This page gives specifications and help about how to use the ODBC Data Provider with the Layer2 Cloud Connector.
To integrate any ODBC-related data source with SharePoint or Office 365 via the Layer2 Cloud Connector please go the following steps:
- Think about 32-bit or 64-bit ODBC. If your data source driver or application is still 32-bit, use the 32-bit installation of the Layer2 Cloud Connector to integrate.
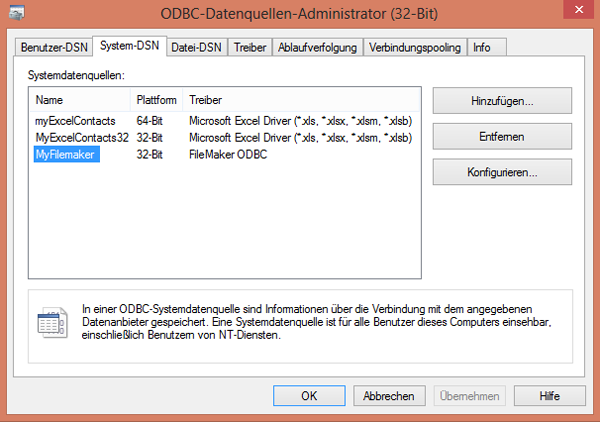
- Define your data source as a System DSN in the ODBC Administrator (32-bit or 64-bit), e.g. with name myDSN.

Fig.: ODBC Filemaker connection configured in the ODBC Manager.
- Goto the Layer2 Cloud Connector Connection Manager and create a new connection. Create blank connection or copy a sample connection that fits best as a starting point.
- Configure the data source as a first data entity.
- Select the ODBC Data Provider in the Layer2 Connection Manager.
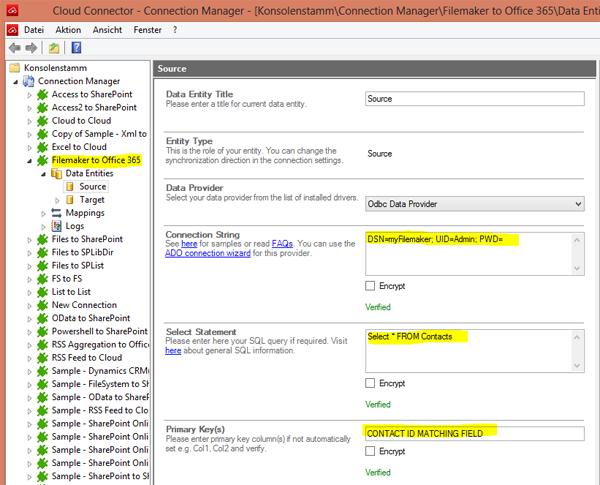
- Enter the connection string, e.g. DSN=myDSN in our example. You can add UID and Password if required, e.g. DSN=myDSN; UID=admin; PWD=myPWD. Verify the connection string.
- Enter your data query. Please note that SQL depends on your data driver (not
the Cloud Connector product). For example for most drivers something like
"select * from myTable" should work. PLease make sure to include any promary key
(unique column) in your query. Verify your data query and display the data
preview (see Action Menu). The first 10 records should be shown. Refine your
query, e.g. remove unwanted columns, add where conditions etc., e.g.
Select myField1, myField2 from myTable where myField1 = 'Hamburg'. - Enter the primary key into the Cloud Connector configuration. Verify the primary key. Your data source configuration is now completed.

Fig.: Sample ODBC configuration in the Layer2 Cloud Connector data source entity.
- Create your data destination list and fields manually. Take care about data types. The Cloud Connector will cast data types as good as possible.
- Configure your data destination as the second data entity. In case it is a SharePoint list, see here for further specifications.
- Goto the Mapping section of the Cloud Connector. You can use Auto-Mapping in case of field names are identical in source and destination or map manually. Please note that you should map some name-type field to the SharePoint Title field as a best practice. Verify mapping.
- Return to the connection settings, verify direction (left to right, right to left or bi-directional).
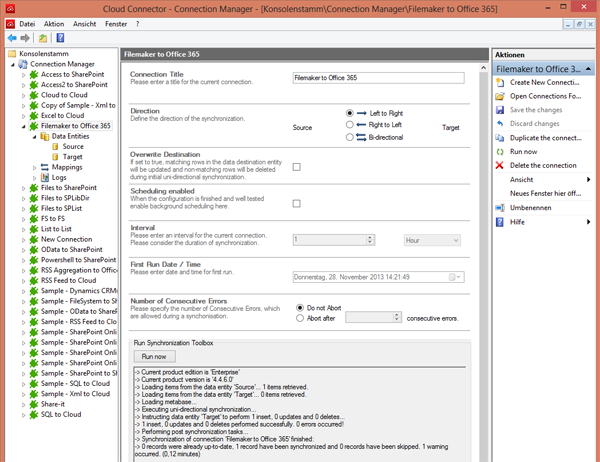
- Click "Run Now" for first synchronization. Take care of warnings or other issues and improve connection, if possible. First sync can take time, e.g. for thousends of data items (approximately 0,5 seconds per item - depending on configuration).
- After first sync press "Run Now" again. In case your primary key works as expected, no changes should be processed and the sync should be very fast.

Fig.: Sample first run to sync Filemaker ODBC data source with Office 365.
Sample ODBC data sources to connect with SharePoint
Generally you can connect almost any ODBC data sources, for example:
Please note that you should use OLEDB or .NET-based provider whenever available for improved performance, e.g. for SQL Server, Oracle databases, Microsoft Access, Excel etc.
Microsoft Office 365 and SharePoint Data Integration via ODBC - FAQs
My data source driver cannot
be found in the ODBC Administrator list. Next steps?
Please check
that the driver is installed on the computer where the Cloud Connector is
running (not at SharePoint). Please also check the versions of driver and
connector: should be both 32-bit or both 64-bit.
Write-back to data source does not work. Where to go
next?
Please check data source driver: does it allow writing? Check
your query: Is it updatable (for example joins are not). Simplify your query.
Check user id: Is it allowed to write (give access rights if required).
Dynamic SQL generation for the UpdateCommand is not supported against
a SelectCommand that does not return any key column information. What does it
mean?
Your data source does not include any primary key. Please add
to data source and query, then try again.
Ready to go next steps?
