Keep your Systems in sync. Download and try the Layer2 Cloud Connector today.
How to sync local text / CSV data with native SharePoint lists?
The Cloud Connector for Microsoft Office 365 and SharePoint connects almost any on-premise data source, e.g. ODBC, OLEDB, OData, Microsoft .NET based providers, Files (Excel, XML, CSV), SQL databases like SQL Server, Oracle, MySQL, IBM DB2, IBM AS/400, IBM Informix, Notes, SharePoint, Exchange, Active Directory, Navision, SAP and many more directly to native SharePoint lists and libraries in the Microsoft Cloud - or any other Microsoft SharePoint on-premise installation - in just minutes without any programming. For any questions please use the FAQ Web Form or contact sales@layer2solutions.com directly.
Integrating external text / CSV data sources (e.g. exports from LOB applications) with native SharePoint lists (e.g. news, contacts, tasks or custom lists) in Microsoft Office 365, SharePoint Online or SharePoint on-premise can close many gaps using Microsoft SharePoint. Exporting text / CSV files on a regular base is helpful in some cases:
- a direct connection to any LOB system via ODBC/OLEDB/ ODATA etc. is technically not possible,
- it causes possible issues in terms of security or availability,
- generally available data providers are very expensive and of high complexity, e.g. needs programming (for example for SAP).
Please note: It's not only about displaying external data in SharePoint - it's about full integration with search, lookups, change notifications, workflows, enterprise metadata etc. Also it is not about bulk import.
These FAQ gives a step-by-step example how to do this.
Prepare your external text / CSV data source to integrate with Office 365
Let's take a sample text / CSV file. Think of it like an export from your LOB application, e.g. ERP, CRM, or something like this.
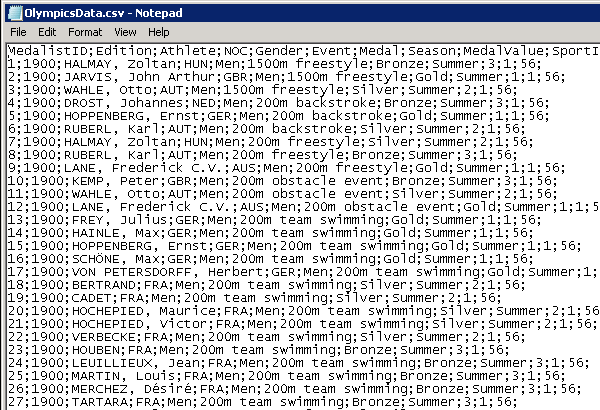
Fig.: The screen shows a local sample text / CSV -based document to connect with a native SharePoint list.
Please note:
- Almost any LOB system should be able to expose data in a format like this using scripts.
- The first line contains the field names in this sample. That could be helpful, but is not a requirement.
- Data types are not known at this point. You can declare specific data types later on or work with standard conversions, the Cloud Connector provides automatically.
- The data source should contain one or more fields that are unique (together) and can be used as a primary key to savely update items in the SharePoint list.
- Generally the data file can be provided on a file share as well (not local computer). Please check access rights carefull in this case.
Setup your text / CSV to SharePoint connection
Declare Data source as ODBC source:
You have to use ODBC to declare your local data source as follows:
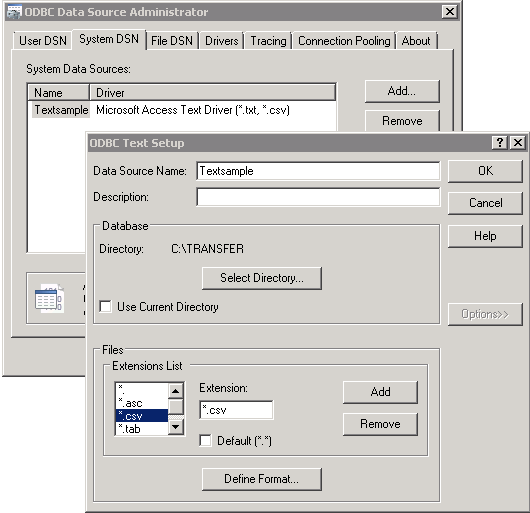
Fig: Create your text / CSV data source in ODBC Administrator as a System DSN
Please note:
- Use 64-Bit ODBC Manager in case your Cloud Conenctor is 64-Bit (or 32-Bit ODBC Manager in case your Cloud Connector is 32-Bit)
- Use the installed Microsoft Access Text Driver (or any other text driver)
- Use System DSN (not User DSN)
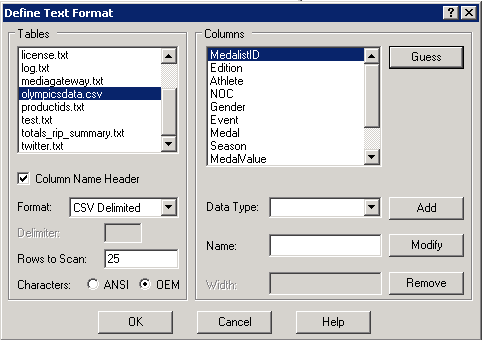
Fig.: Selecting options for text / CSV file processing
Please note:
- You can optionally enable column name header, delimiter character, character format, data types, if required.
Setup Data Source:
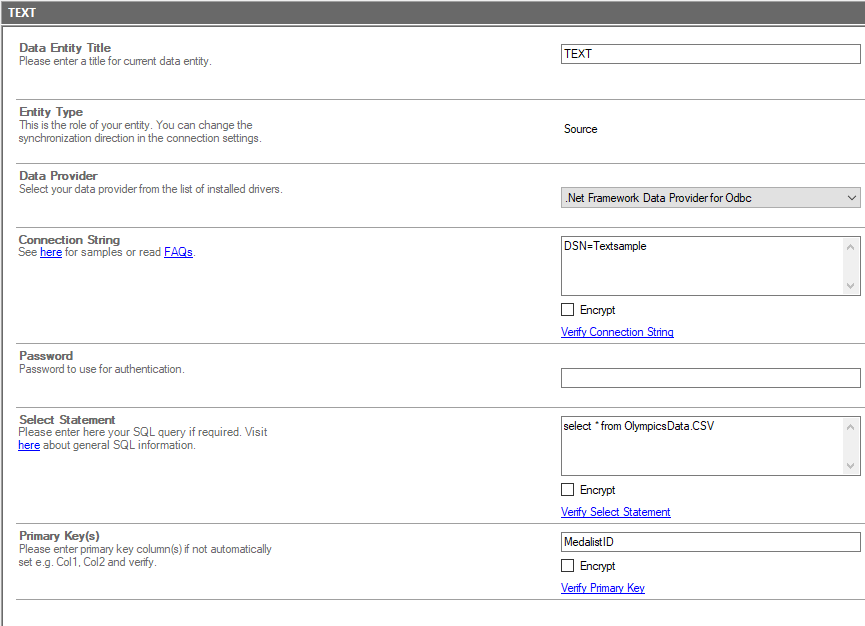
Fig.: Refer to the ODBC DSN in the Cloud Connector Connection Manager.
Please note:
- Select the ODBC Data Provider
- Enter the DSN in the conenction string
- Select your data in the data query
- Enter a primary key (or combination of unique fields, e.g. Field1; Field2)
- Verify all steps and take care about possibe error messages
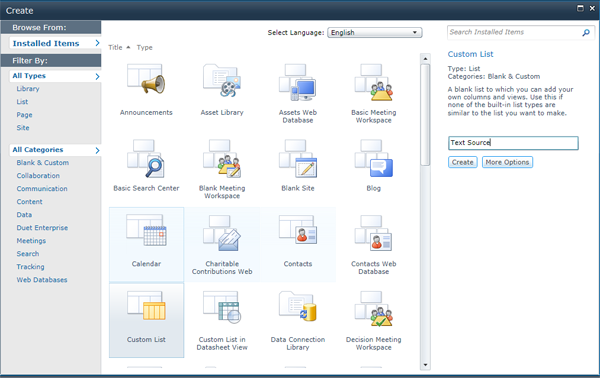
Fig: Create your SharePoint List manually and add columns required to keep the data
Please note:
- You have to create your list manually in SharePoint
- You can use all list types, e.g. News, tasks etc. - a Custom List in these sample.
- Please add columns manually as required. Take care about data types.
Setup Data Destination:
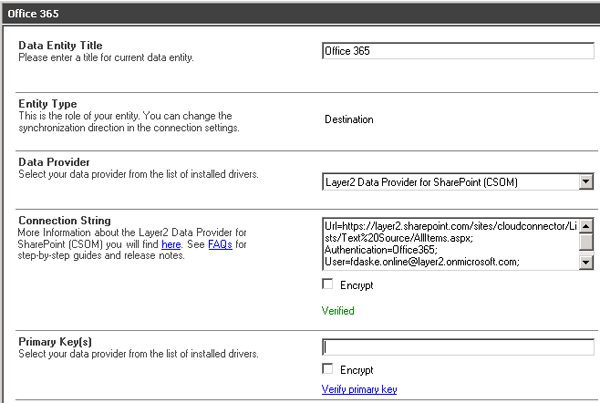
Fig.: Connect to the SharePoint list using the Layer2 Data Provider for SharePoint.
Please note:
- Select the Layer2 Data Provider for SharePoint (CSOM) to connect to the data destination
- See documentation for connection string options.
- No primary key information must be given (SharePoint item ID is used automatically).
- Verify all options and take care about error messages
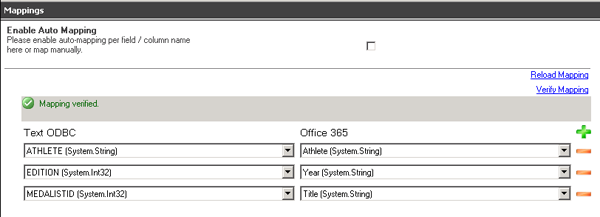
Fig.: Setup field / column mapping between data source and destination.
Please note:
- You can use the Auto Mapping feature in case fields and columns are created with the same name.
- Be careful about data types. Simple conversions are provided automatically.
- Map some field to the SharePoint Title column as required by SharePoint
Verify the mapping and take care about warnings or error messages.
Run the connection:
You can now run the connection on-demand using the "Run Now" button in the Connection Manager and take a look at possible warnings or error messages in the log file. Also take a look at the result page in SharePoint.
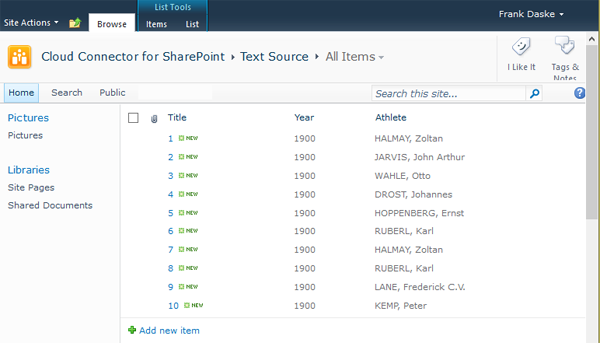
Fig.: SharePoint result page of the data destination - a native SharePoint list, automatically synced with data source.
Please note:
- After first insert, please run connection again. There should be no changes with this run, if no source data was modified.
- Selected items only are transferred with first insert with respect to the data query.
- Changed items are transferred only on next updates. That means, you can setup change notifications per-email or workflows in the cloud without any restrictions.
- You can add additional "SharePoint only" data, e.g. attachments or managed metadata. It will be kept while items are updated.
- You can do anything you can generally do with a SharePoint list - without any restrictions (e.g. search).
- Don't forget to setup the background update (via Windows service), to keep data current in the Connection Manager connection settings, e.g. with scheduled updates every 10 minute, per hour or daily, if required.
Ready to go next steps?
