Keep your SharePoint in sync. Download and try today.
Office 365: How to sync external XML data with native SharePoint lists?
The Layer2 Cloud Connector for Microsoft Office 365 and SharePoint connects almost any on-premise data source, e.g. ODBC, OLEDB, OData, Microsoft .NET based providers, Files (Excel, XML, CSV), SQL databases like SQL Server, Oracle, MySQL, IBM DB2, IBM AS/400, IBM Informix, Notes, SharePoint, Exchange, Active Directory, Navision, SAP and many more directly to native SharePoint lists and libraries in the Microsoft Cloud - or any other Microsoft SharePoint installation - in just minutes without any programming. For any questions please use the FAQ Web Form or contact sales@layer2solutions.com directly.
Integrating external XML data sources (e.g. from LOB applications) from file system or web requests with native SharePoint lists (e.g. news, contacts, tasks or custom lists) in Office 365, SharePoint Online or SharePoint can close some gaps using Microsoft SharePoint, on-premise or in the cloud. Please note: It's not only about displaying external data - it's about full integration with search, lookups, change notifications, workflows, enterprise metadata etc.
This FAQ gives a step-by-step example how to do this.
Prepare your external XML data source to integrate with Office 365
Let's take a sample XML, the well-known CD catalog. Think of it like an export from your LOB application, e.g. ERP, CRM or something like this.
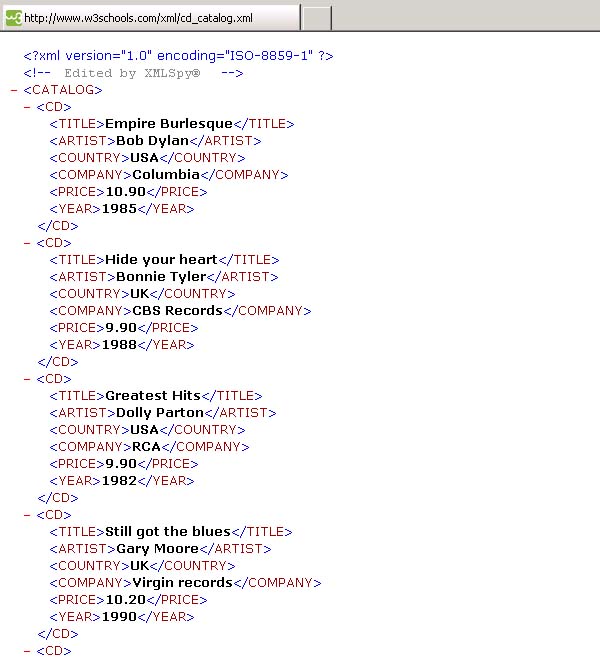
Fig.: The screen shows a sample XML-based document to connect with a native SharePoint list.
Please note:
- Almost any LOB system should be able to expose data in a format like this
- XML files are supported as well as web requests (per URL)
- You can query / filter data subsets later on using XPath
Setup your XML to SharerPoint connection
With the Cloud Connector Connection Manager (a MMC snap-in) you have to setup:
1. the connection (e.g. uni-directional with overwrite, scheduling etc.),
2. the data source (your XML file or web request) and
3. the data destination (in SharePoint on-premise, SharePoint Online or Office 365. The list must be created manually before).
You can use auto mapping to connect the fields of both data entities by name or map fields manually.
See here for sample connection settings:
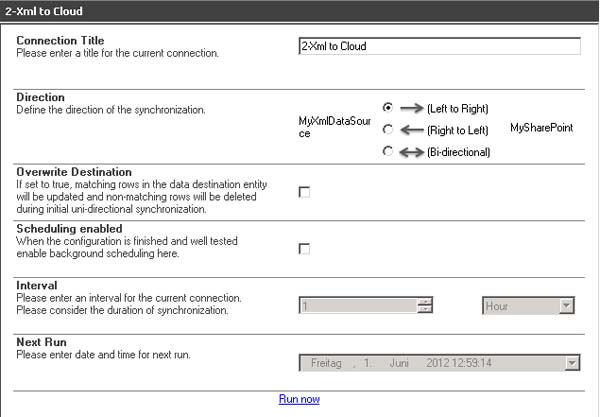
Fig.: Sample XML to Office 365 one-way connection.
Please note:
- Bi-directional connections are not supported for XML data sources at this time.
- If overwrite destination is enabled, non-matching entries in the destination are removed with initial sync.
- Please enable scheduling later on, when all settings are verified and you have an idea of replication duration. Duration time depends on bandwidth, performance of source and destination, and number of entries in XML. Only changes are transferred later on.
Before running the connection, you have to define the data source and destination.
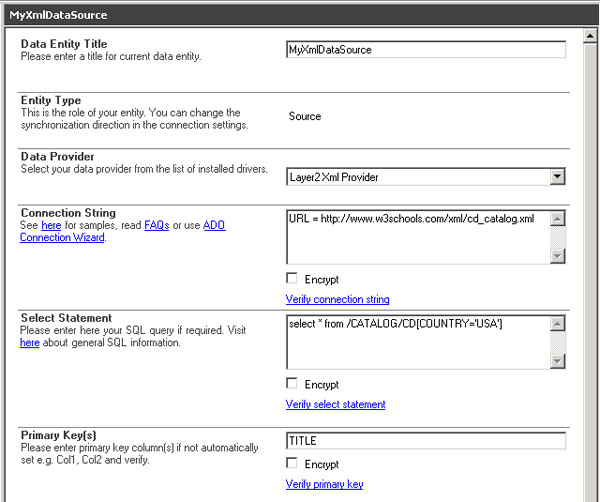
Fig.: The Layer2 XML Provider is used to connect to the data source, e.g. an XML web request.
Please note:
- Select the Layer2 XML Provider
- Enter the file path or URL to your XML data as connection string.
- The provider offers a XPath-based query language to select your data subset
from the XML data source after the FROM keyword in the select statement.
Please read more about XPath here. - You can optionally select named attributes with the select statement, e.g. "Select TITLE, COUNTRY, ...)
- Use the data preview to check out the result of your Xpath query. You can use any 3rd party XPath tool to test.
- You have to enter a "primary key", some column with unique values in your query result.
- Please verify all settings before save.
Next you have to define your data destination:
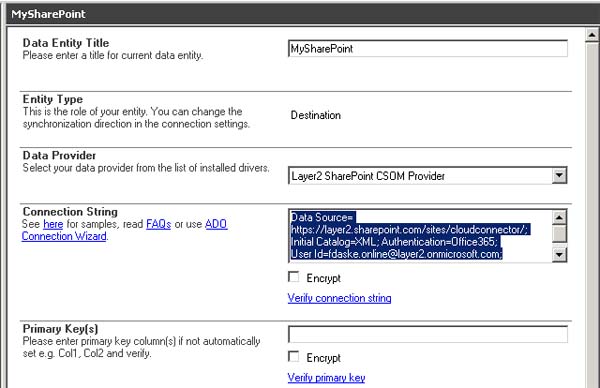
Fig.: Data destination sample, a list "XML" in the Office 365 cloud.
Please note
- Use the Layer2 SharePoint CSOM Provider to connect to SharePoint on-premise, SharePoint Online or Office 365.
- You have to create the destination list manually with all columns required to host your query data.
- Read more about connection strings to connect to Office 365, SharePoint Online or SharePoint on-premise here. Please note that you can connect to any other data destination, e.g. to a SQL database.
- There is no need to enter a primary key, the provider automatically uses the SharePoint item ID.
As a last step you have to setup the column / field mapping. You can use the auto-mapping feature (by field / column names) or map manually.
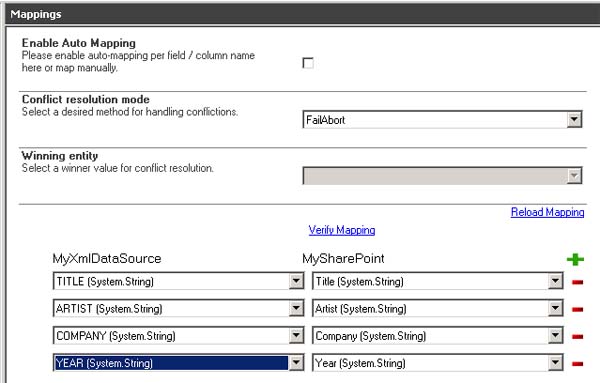
Fig.: Sample field / column mapping of data source and data destination.
If all settings are verified, please go to connection root and run the connection manually first. Please note, that it could take some time to transfer all nodes. You can take a look in your cloud list to see how it goes on.
See your XML data in the Office 365 SharePoint list
Now take a look at your list now. All items are in there, after running the connection.
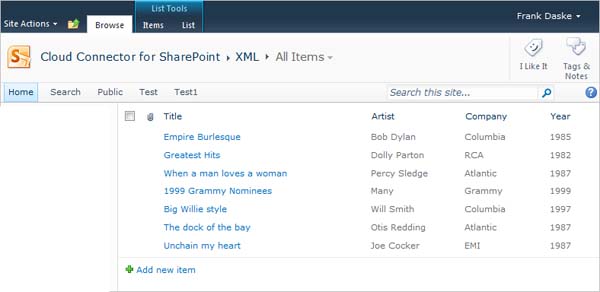
Fig.: Sample data destination in the Office 365 cloud.
Please note:
- Selected items are transferred only, e.g. only items with country = "USA" in this sample.
- Changed items are transferred only on update. That means, you can setup change notifications per-email or workflows in the cloud without any restrictions.
- You can add additional "SharePoint only" data, e.g. attachments or managed metadata. It will be kept while items are updated.
- You can do anything you can generally do with a SharePoint list - without any restrictions (e.g. search).
- Don't forget to setup the background update, to keep data current in connection settings, e.g. with scheduled updates every hour or daily.
Ready to go next steps?
